Tuesday, December 20, 2011

The Beets Strike Back!

Great news!

The beets I transplanted did in fact sprout new leaves about a week after they were moved.  The old stems and leaves are retaining water but continue to wither.

Transplanted Beets sprout new baby leaves.


The carrots are showing signs of recovery as well.  They do not have new growth like the beets but some of them are holding themselves fully up and off the ground again.

Transplanted Carrots are recovering.


The broccoli and brussels sprouts are unfolding gorgeous full leaves that get bigger by the day.  A new set of holes began appearing on them.  When I looked closer I discovered a small green worm.   An hour later I had picked off eight total.  They have not done enough damage to make an impact on the plants - yet.  It could be time for the Garlic Fire Spray.

Look close - can you see the worm?
See the worm on my finger tip?


One more snap shot of the whole garden just a few days before Christmas.


2.5 Months of Growth!


Saturday, December 10, 2011

Thirty is a Crowd

As it would turn out, my garden pests were tiny snails.  These guys are easy to spot and to pick off plants while weeding.  Because of that I did not make the Garlic Fire Spray.  

San Diego has been rainy and sunny and then rainy and sunny again.  It was perfect.  I was pulled hard into a work project in November that left me running out the door with barely a splash of water on my face let alone standing with a hose in the garden.  But that is life and I want to thank Mother Nature for being there for me in my time of need! :)

Everything grew in abundance.  And I do mean - everything!  The surrounding dirt has spawned legions of singing nettle.  This made my gardening in flip flops idea a .... well, flop.   

Behind it all was a lovely, and very crowded, garden of thriving vegetables.  


It was clearly time to make a little space so that everyone could stretch out.  So began the process of thinning the carrots and beets.  What came out of the ground was so cute I had to take a picture.


To help me be sure I was thinning properly I used these two videos as reference.


After thinning :)


I had this pile of pulled baby beets and carrots that just seemed too much of a waste to throw away.  I looked around on line to find out if anyone had ever replanted them.  I found a lot of debate on the topic but ultimately learned that some might take so I decided it was worth the chance. 

Replanted Beets

Replanted Carrots


Can it really be done?   Here is one answer.      


Next it put my Asparagus in the ground!


I had three asparagus plants that were purchased in pots who had remained in pots over the last two months.  After noticing they were not looking their best I decided to put them in the garden.  Especially now that I had made some room for them.


Time to check in on the cast of characters!
               
Beets

Carrots

Brussels Sprouts


Broccoli


Elephant Garlic --- Smells like garlic already by the way!


Two more shots to take it all in.


Transplanted beets to the left and thinned garden to the right.

The small square marked by rocks are the replanted carrots.


Sunday, November 20, 2011

After The Rain!

Time to check in with the growth.  It is the 20th of November and just over a month since seeding my my winter vegetable garden.

The last few weeks have been rainy.  At first I thought this was great because it meant I did not have to water as much but instead I would face a different task.  Making a garden from one's own backyard soil means dealing with an drove of weeds all hatching from their little well wetted seed encasings after a series of heavy rains.  There are soooo many!  

As it turns out - weeding is very relaxing when they are baby sprouts and the soil is moist.  Plus I enjoy being outside in the fresh air.

There is a whole little echo system down there in the dirt.  So much activity!  I noticed a few little bug bites on the broccoli as well.  Luckily - I prepared for this moment.

It's time to bring out the Garlic Fire Spray - my natural solution to pest control.

Below are pictures of the veggies from earlier this week - including Brussels Sprouts who joined the party last.


Elephant Garlic

Broccoli 

Beets

Brussels Sprouts

Carrots 

The whole happy family! :)

Sunday, November 6, 2011

Proud Papa!


Please allow me to introduce 
my new children! 


  Elephant Garlic! 


Carrots!


Beets!


And Broccoli! 


So far a discipline of weeding twice a week and watering every other day is working well.

Saturday, October 15, 2011

Winter Vegetables


Here I am, mid-October and ready for my winter vegetable seeds to go into the ground.

Keep in mind I am planting based on what grows well in Southern California's climate and following the advice of Pat Welsh's Southern California Gardening book.

Before planting I needed something to loosen up the soil and mix in fertilizers. I found a Garden Tiller at Home Depot that was perfect for the job! Not only was this tool great for getting my soil ready for seeds, but it was perfect for grabbing and sifting up small rocks that I decided to use as an outline for my first planting area.


I spent a considerable amount of time making the soil soft so that I would not need an above ground bed of earth. In my prior blog post I mentioned testing my soil type and PH and both indicated I had perfect earth for planting.

Just to be sure I had the best soil in the garden I scooped the top soil up from the the ground around the garden and shoveled it into my designated planting area.


I took a trip to City Farmer's Nursery in San Diego to purchase my winter vegetable seeds. They happened to have Asparagus already growing in pots so I opted to buy them that way instead. I had a budget of $25 for this part of the project and I stayed under that.

3 pots of Organic Asparagus
1 pack Organic Broccoli Seeds
1 pack Organic Brussels Sprouts Seeds
1 pack Organic Carrot Seeds
1 pack Organic Beet Seeds
3 Cloves of Organic Elephant Garlic


Next - I Googled videos of how to plant each type of seed. And here they are:


Then I went ahead and planted all my seeds. That process was too dirty to use my camera phone, but here is the finished product.

I moved forward with this one garden prior to installing my drip irrigation system.

It should not be too hard to water every day. But as I expand I plan to get that in place.


Next up:
Planting a spice garden indoors to transfer to outdoors in the Spring.
Blueberries
Dwarf Fig Tree

Friday, October 7, 2011

A Vacation in the Backyard


Lady bugs are good luck!
They are also organic insecticide for a garden.
Last year when I found dozens
of them in what would soon become my own back yard, I knew it was on!


The first step was to tame the beast of a bougainvillea that had taken over two thirds of the space. Turned out to be two bougainvillea and some other woody vine bush. The images below chronicle the many weekends it took to get them trimmed back and cleared out.


It was this bougainvillea that inspired me to take a week off of work and spend it in my back yard. It was just so monstrous and I really wanted to get a garden going this year. So - I did it. I took four days off work, saved the money on travel and began transforming my own back yard into a worthy retreat from the day to day that I can escape to all year round.

It did not take long for me to realize I needed help!

Thank goodness I discovered

This book - is amazing!
Its chalked with all you need to know to garden in Southern California's soil and climate. Everything from lawns and flowers to trees, succulents, fruits, veggies & herbs are covered. The book is laid out in months of the year and a check list for each that includes what to plant, prune, pick, fertilize, buy, water and what pests or disease to be on guard for. A library of seed, plant and garden supply sources is in the back. Pages have step by step instructions and reads like a gardening for dummies.


Now that my area was clear of growth
it was time to see just what kind of soil I was dealing with.

I am very lucky - my soil type is loam,
which is ideal for growing plants.
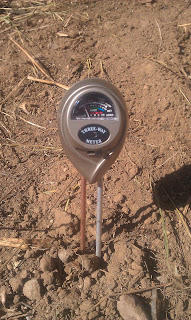
I checked my soil pH multiple times across t
he yard and in all areas it around 7.
Again - perfect!

I will need to conduct a drainage test to be sure water is absorbed at a rate of about 1/4 inch or more per hour to be sure my plant's root systems will grow deep and therefore
make the plant stronger. If drainage is poor Ill need to go with above ground garden boxes.


I scanned through the November, December & January sections of my book looking to see what edible plants I could put in the ground first. Here is my planting schedule.

November
Garlic
Broccoli
Artichokes
Asparagus
Brussel Sprouts

December
Celery
Herb Garden in indoor pots to transfer to the ground in Spring.
(Marjoram, Parsley, Rosemary, Sage & Thyme)

January
Blueberries (Rabbit eye
or Southern High Bush)
Dwarf Fig Tree


Creating this planting schedule really motivated me to meet the dates. I began chipping away at this project from multiple angles to stay on target.


Ultimately the goal is to fertilize the garden with compost from a worm composting system. But based on my budget and the time to produce compost I won't have that cycle in full swing until late November.

So I purchased some organic blood meal and vegetable fertilizer to support my winter vegetable schedule.


In addition to the garden I insisted that I wanted to raise a few chickens in my back yard. I was so excited to find out that I live in an area in San Diego where chickens are permitted. I looked up a few places to purchase chicks and priced out a few coops. Ill be eating my own eggs for breakfast before you know it, raising my own organic free range chickens!


So I fixed the fence and worked the chickens into the budget for December.


I have a dog that often poops in the back yard. With chickens on the way I needed add their poop to the equation and figure something out.

Knowing I had a worm compost on the way I wondered if I could put dog and chicken poop with my kitchen scraps. Chicken poop was a yes but dog poop was a no!


So thanks to Mike Levinston on YouTube I was able to quickly put together my own dog poop compost system to keep it from contaminating my vegetable garden.


Next it was time to imagine the space.

I took measurements of the yard in feet and then converted them to inches to play around with what I wanted on a piece of paper.


The image above has 6 square gardens, space for the fig tree, space for the chicken coup and a large area reserved for a table for outside dining in the summer. I arranged my gardens based giving them the most sunlight possible and allowing myself enough space to walk and work around them.

When I thought I had it just right I re-created the spaces in the backyard with warning tape so I could walk around and interact with them a bit more.


A lot of progress - in a short period of time. Im proud of myself. Happy to report I am right in line with my budget and really enjoying the work.


My key next steps include:
Purchase a subscription to San Diego Home/Garden for fresh ideas.
Completing that drainage test.
Purchasing seed.
Pre-fertilize the soil based on the winter vegetable (2 weeks prior to planting).
Maintaining a weed free yard by covering areas I am not currently using with mulch.

More blogging to come ......